
Dreamweaver in version 3 added a widget for making nice dropdown menus, called the "Spry Menu".
Here's how to use it.
First, create a page.
Click where you want the menu. Select Insert -> Spry-> Spry Menu Bar.
Dreamweaver will ask you if you want the menu to be horizontal or vertical. I'm going to select horizontal.
Dreamweaver will insert a dummy object that looks like this:
This is our menu, with some dummy choices entered. We will fill out the rest of the information.
The system involves lists. Each layer of menus is an html list, of links.
Each list item has a label (some text) and this is then made into a link by using the <a href="blahblahblah.com">text label</a>
For example this would make a very simple menu of tv networks:
<ul>
<li><a href="http://www.cnn.com">CNN</a></li>
<li><a href="http://www.abc.com">ABC</a></li>
<li><a href="http://www.cbs.com">CBS</a></li>
</ul>
That example isn't an actual menu, you also have to insert the ID tags and so on, but it shows the layout of a list.
If you want to make a sub-menu then you make a list within a list. Pretty simple.
Let's look back at the code that Dreamweaver made for us, and start making changes:
First, for a very simple change, I'm going to enter some names in the menu items by overtyping them in the design window. Here's what it looks like now:

Now I'm going to have a look at the html that has been created. Basically what we have is a nested HTML list. Look at the "class" options and the "id" options. These allow the CSS to turn the list into a menu.
Here's that html:
<ul id="MenuBar1" class="MenuBarHorizontal">
<li><a class="MenuBarItemSubmenu" href="#">Home</a>
<ul>
<li><a href="#">Item 1.1</a></li>
<li><a href="#">Item 1.2</a></li>
<li><a href="#">Item 1.3</a></li>
</ul>
</li>
<li><a href="#">Bananas</a></li>
<li><a class="MenuBarItemSubmenu" href="#">Cherries</a>
<ul>
<li><a class="MenuBarItemSubmenu" href="#">Item 3.1</a>
<ul>
<li><a href="#">Item 3.1.1</a></li>
<li><a href="#">Item 3.1.2</a></li>
</ul>
</li>
<li><a href="#">Item 3.2</a></li>
<li><a href="#">Item 3.3</a></li>
</ul>
</li>
<li><a href="#">Onion</a></li>
</ul>
OK, now I am going to put in a bunch of links and modifiy the choices so that the links work. Each time there is a menu choice, I will replace the text, then put in a real link instead of the nonsense text and nonsense links that Dreamweaver created. I will leave the overall layout of the menu the same. Same number of links and choices and menus and submenus.
<ul id="MenuBar1" class="MenuBarHorizontal">
<li><a class="MenuBarItemSubmenu" href="#">Searches</a>
<ul>
<li><a href="http://www.google.com">Google</a></li>
<li><a href="http://www.yahoo.com">Yahoo</a></li>
<li><a href="http://bing.com">Bing</a></li>
</ul>
</li>
<li><a href="http://www.youtube.com">Youtube</a></li>
<li><a class="MenuBarItemSubmenu" href="http://www.nytimes.com">NY Times</a>
<ul>
<li><a class="MenuBarItemSubmenu" href="http://www.brandx.net">Brand X</a>
<ul>
<li><a href="http://www.brandx.net/support">Support</a></li>
<li><a href="http://mail.brandx.net">Email</a></li>
</ul>
</li>
<li><a href="http://www.cnn.com">CNN</a></li>
<li><a href="http://www.spiegel.de">Der Spiegel</a></li>
</ul>
</li>
<li><a href="http://www.theonion.com">The Onion</a></li>
</ul>
Here's what the final menu looks like:
You can just follow the pattern to create your own menu. Remember that there are some program files that are required to make this work, and you have to copy them to the server if you want the menu to function. These files are located in files called "spry-name-choice.png", "spry-object.png", and a folder called "SpryAssets" which Dreamweaver creates when you insert the Spry menu into your page. Look in your file list and you will see what I mean. Remember to upload these and you should have an easy time getting these menus to work.
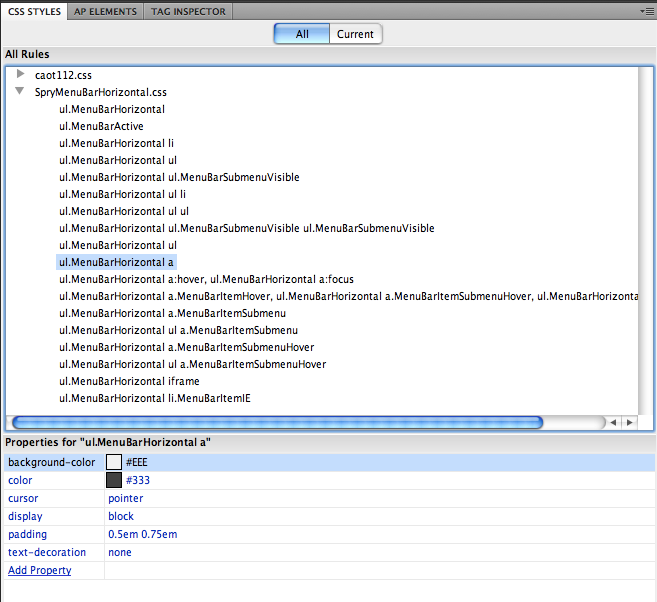
A new stylesheet for the Spry widget was added to your site when you added the widget. To change the color scheme or any other appearance rules, go to the CSS panel and modify any colors, sizes or styles that don't match your site. Find the style you want to change and click the pencil icon to edit the style. Make any changes you want and Click OK.
If you look at the list based menu we built with the W3schools notes, you will see that it's quite similar. The various properties may at first seem bewildering but if you remember that, like the W3schools menu, we they have redefined how lists and links are displayed, so that the list becomes your menu items. For example, here's the css section where they set the Spry menu backround and text colors:
Menu font settings are set in the ul.MenuBarVertical style. The color of the text will be defined elsewhere.
By default, the width of the top-level menu and each menu item is set to 8 ems. An em is your font size, ie, if your font is 12 point then 1 em = 12 points. If you change your font size the size of an em changes, and the size of the menu changes too.
To specify a specific pixel width for the top-level menu: In BOTH ul.MenuBarVertical and ul.MenuBarVertical li styles replace width: 8ems with width: XXXpx.
Note that changes made to ul.MenuBarVertical and ul.MenuBarVertical li affect only the items in your top level menu. The width of pull-down menus is not affected.
Caution! You can control the height of items in your menu bar by specifying a height attribute in the ul.MenuBarVertical a style. But be careful. This can cause type to be cropped or even disappear if text is resized or a menu item unexpectedly wraps to a second line. It’s more flexible to let the height of your menu items be determined automatically by the font-size (specified in ul.MenuBarVertical) and the padding (specified in ul.MenuBarVertical a).
The color of menu items in the link state (when they are not being hovered over or clicked) is determined by the ul.MenuBarVertical a style. To change the look of your menu items, simply change the default background-color and color styles DW has provided. This is also the place to add borders if you want to visually separate the menu items.
To keep it simple, set the background-color and color styles to your preferred rollover colors in the following two style definitions:
ul.MenuBarVertical a:hover, ul.MenuBarVertical a:focus
ul.MenuBarVertical a.MenuBarItemHover, etc.
In THEORY, the first definition determines the hover state of menu items and the second definition controls the appearance of menu items with open submenus. In REALITY that’s the way it works in Explorer. However in Firefox and Safari BOTH the hover state and the appearance of menu items with open submenus are governed by the second definition. I usually just make sure both definitions have the same settings for background-color and color and forget about it.
In DW’s vertical menu bars, menu items which open to submenus have a right-pointing arrow at their far right edge. These arrows are actually background images. If you change the background color of menu items or their rollover state, the arrows may become difficult to see.
The easiest way to change the look of the arrows is to replace the graphics that Dreamweaver provides:
SpryMenuBarRight.gif - black arrow pointing right
SpryMenuBarRightHover.gif - white arrow pointing right
Alternately you can edit the background image attribute in the appropriate style definition as described below:
Edit ul.MenuBarVertical a.MenuBarItemSubmenu for menu items with a submenu.
Edit ul.MenuBarVertical a.MenuBarItemSubmenuHover for the hover (rollover) state of menu items with a submenu.
DW images are found in the SpryAssets folder. If you don't like them you can replace them.
Create a page with both a horizontal and a vertical menu. Each menu should have at least four choices and one nested submenu. All the links should point to real web pages and work.