


Netgear Nighthawk
This is one of the most popular high performance routers available. It is faster and has more range than the devices provided by Actiontec or Motorola. It is an ethernet router, which can be used for DSL or for Fiber connections. If you use it for DSL you will need a modem.

Setup
To set up this router you will need a computer with an ethernet port. If you have a new Mac with no ethernet port, please buy the ethernet port attachement. You can get this from the Apple store for $29, or you can get a third party item from Amazon for about $9. Or just borrow a laptop from a friend. Really. We always like to do things the easy way, and this is the easy way to get this job done. Please use an ethernet cable to connect to the router.
If you are really sure you want to try to configure with WiFi, then connect your computer to the router via WiFi. You will need to know the SSID and password. If this is a new router then you may find htem on a sticker on the back. Once you are connected, continue the instructions the same as if you are connected via ethernet. We discourage configuring this way because there are a lot of things that can go wrong and it can be frustrating. Ethernet is easier. You have been warned.
Before you set up, make sure if your connection is PPPOE or DHCP. Fiber connections are all DHCP. Most of our new customers are DHCP, but not all. You will need this information in a few minutes when you configure the line type. If your line is PPPOE then you will need a username and password. You cannot guess this information.
Also, before you set up this router, please make sure that you have a good DSL signal to your modem. This means your "DSL" light on the modem should be solid green (not blinking). The appearance and labelling of the DSL light varies from brand to brand, but every modem has one. The following image is a Netgear modem, but other brands such as Motorola are similar.
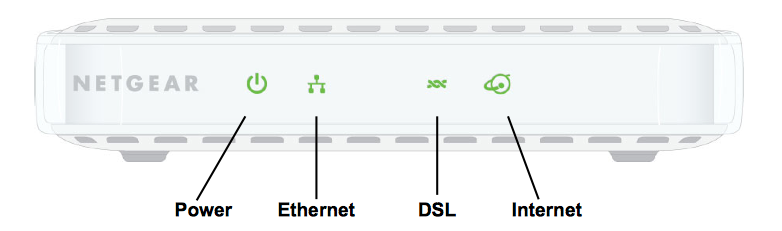
You must have a solid green DSL light or nothing is going to work.
Let's assume you have that sold green DSL light on the modem.
Connect an ethernet cable from the modem to the router, and another cable from the router to your computer, as shown below:
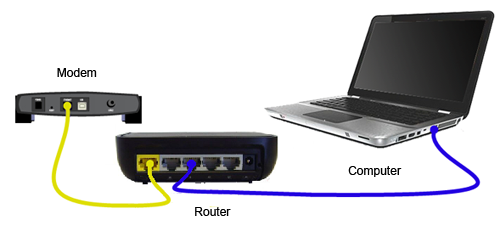
Note that the plugs for the computers (4) and internet (1 only) are different colors and should be labelled. If you plug the modem into one of the four computer ports, nothing is going to work.
OK great, we are ready for configuration.
Access the Nighthawk
Like most other routers, the NIghthawk has a web page interface where you can make changes, then hit save to save them. Very easy.
Open up your web browser such as Chrome, Safari or Firefox, and enter the numerical address for the router, which is usually 10.0.0.1. If that doesn't work, try 192.168.1.1 or 192.168.0.1. You will know when you have the right one because the router wll immediately ask for a password.
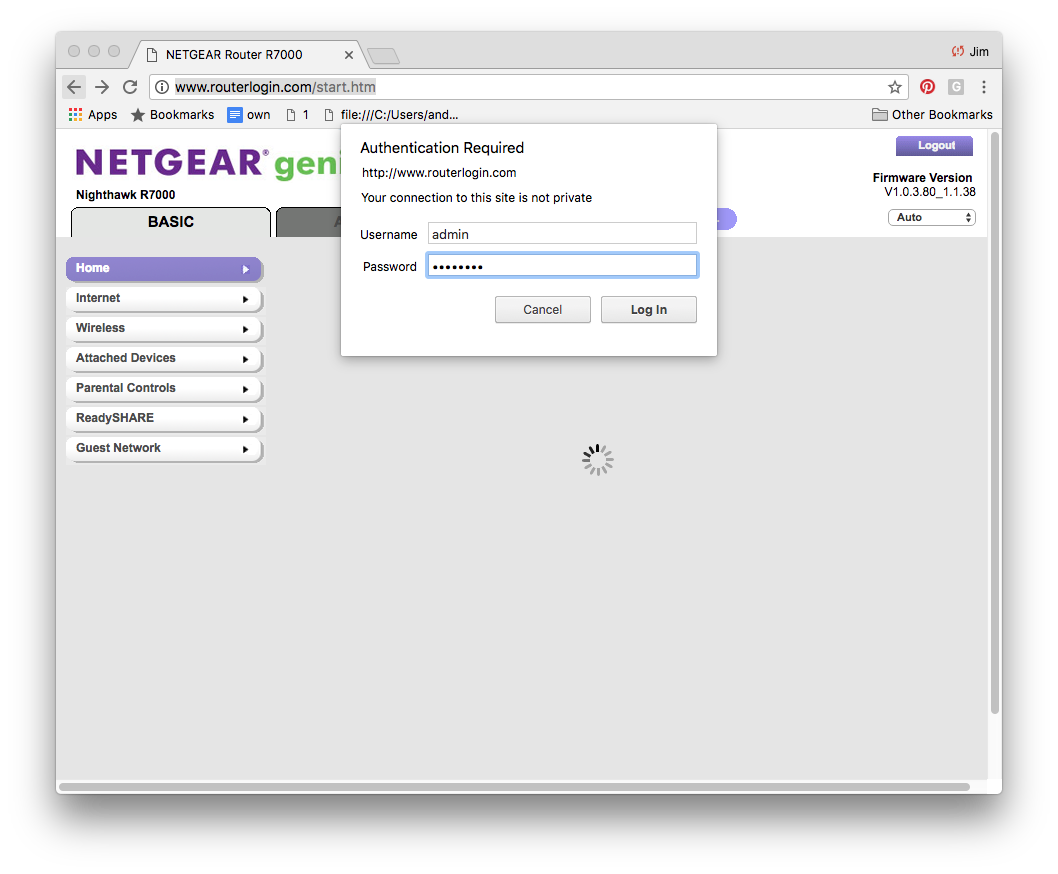
The username is always "admin".
The password is usually "password" but sometimes "admin" or sometimes no password at all.
As soon as you get into the router, you will see the configuration interface. Netgear calls this page "Genie".
Configuration
Select "Internet" from the menu at left. Our first task is to configure the line.
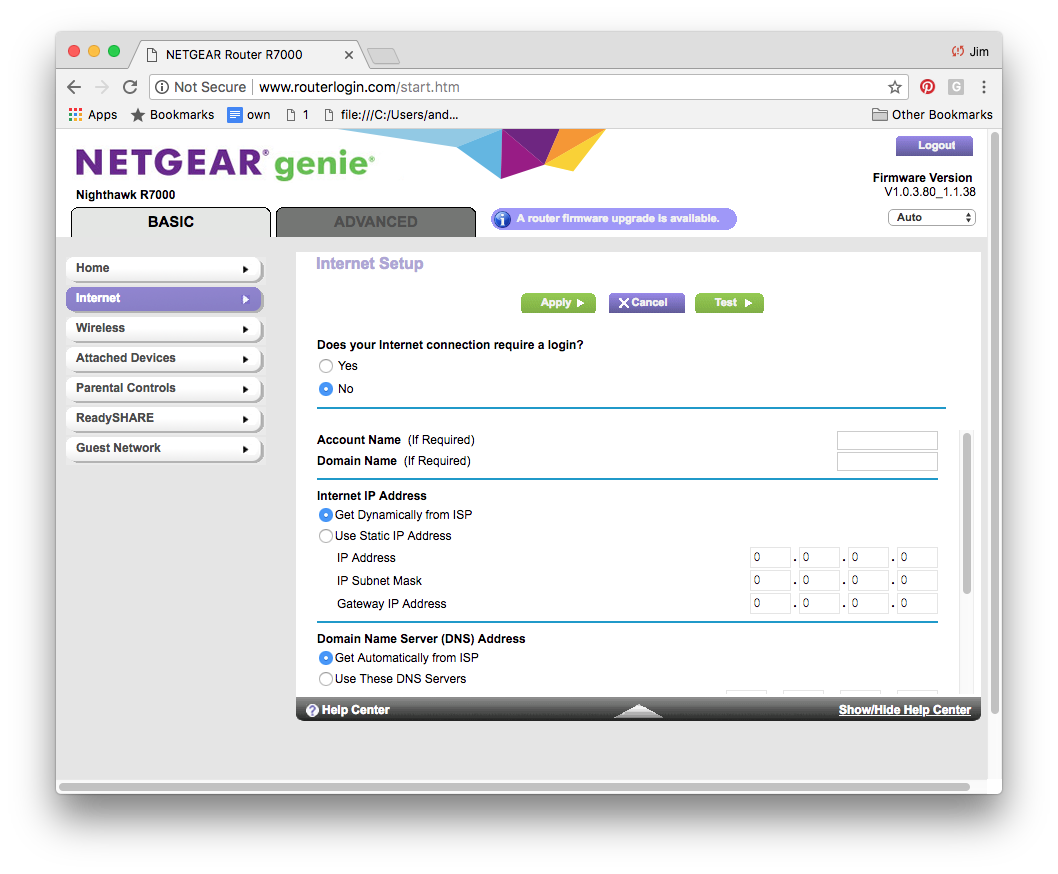
Let's go through the questions on this page in order.
Does your internet connection require a login?
If your connection type is "DHCP" then the answer is no, and you don't need to answer anything else on this page, though if you like you can set the name servers to 8.8.8.8 and 8.8.4.4 if you would like to use Google DNS, which we recommend. Hit apply to save the line settings. The router will take about one minute to save this, and you should now be online. Skip the PPPOE instructions and go down to the section on checking the lights on the router.
If your connection type is "PPPOE" then the answer to this question is "yes". PPPOE means there is a network login that your router should know. You should have a username and a password. Enter these. Your screen should look something like this:
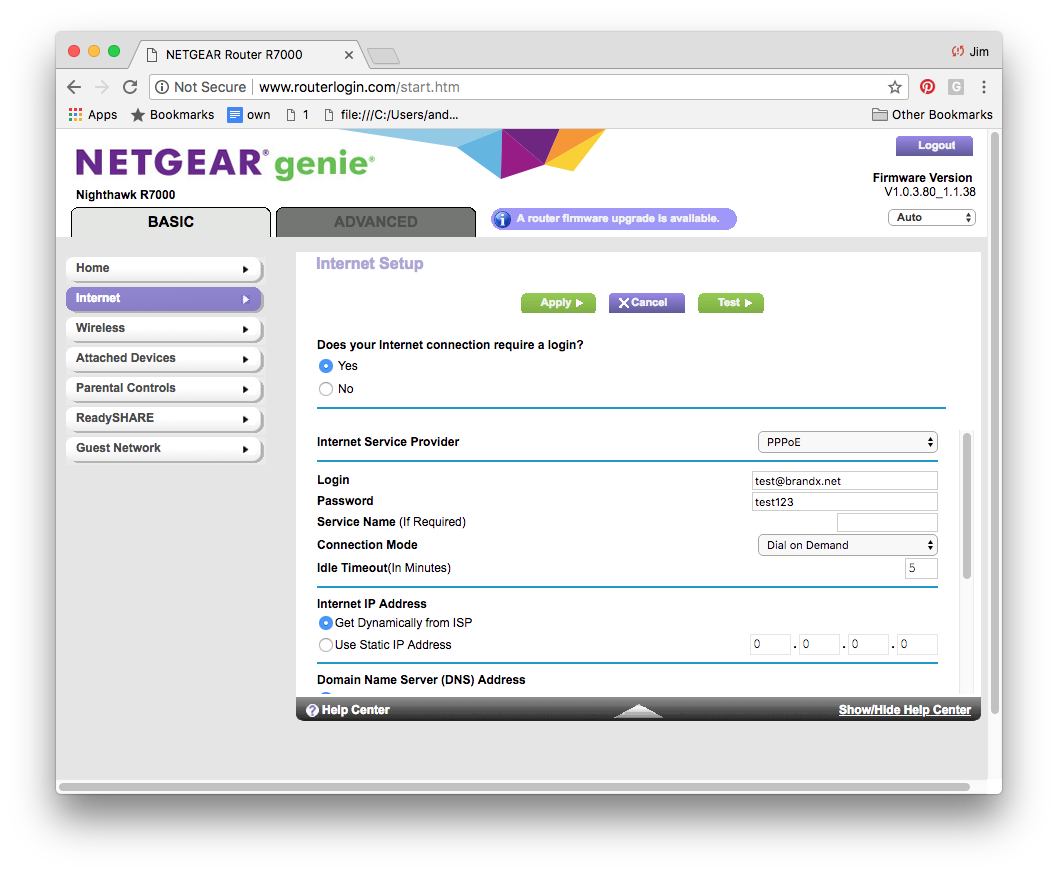
Notice that the "Internet Service Provider" is set to "PPPoE" and we have entered a login and password. We don't need to set anything else, though if you like you can set the name servers to 8.8.8.8 and 8.8.4.4 if you would like to use Google DNS, which we recommend. Hit apply to save the line settings. The router will take about one minute to safe this, and you should now be online. Go to the next section on checking the lights on the router.
Confirm we are online
If everything has gone smoothly, we should now be online.
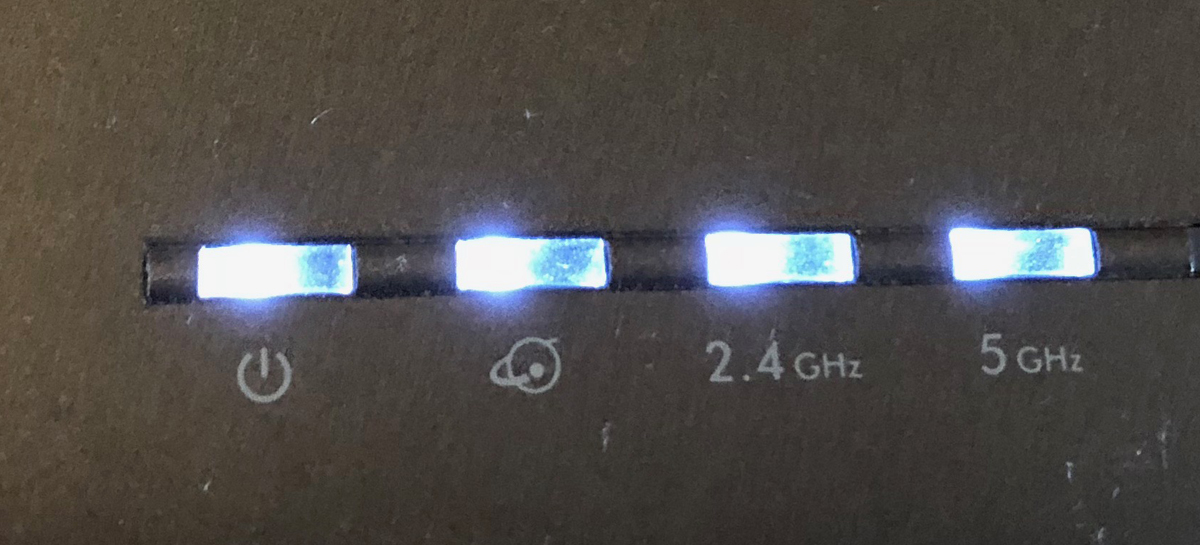
The modem lights will be helpful. Have a look at this photo closeup of a router that is online. Notice the second light, the one with the planet. It is lit. This means the router believes that it is online.
If that works, then we pretty much should be online.
The next step is to try some web browsing with your computer, the one that is attached with the ethernet cable. You should be totally online and should be able to surf the internet. Go to Google and look up something you have never looked up before, such as "Aetius" or "Sayulita". If it comes up, then you are online.
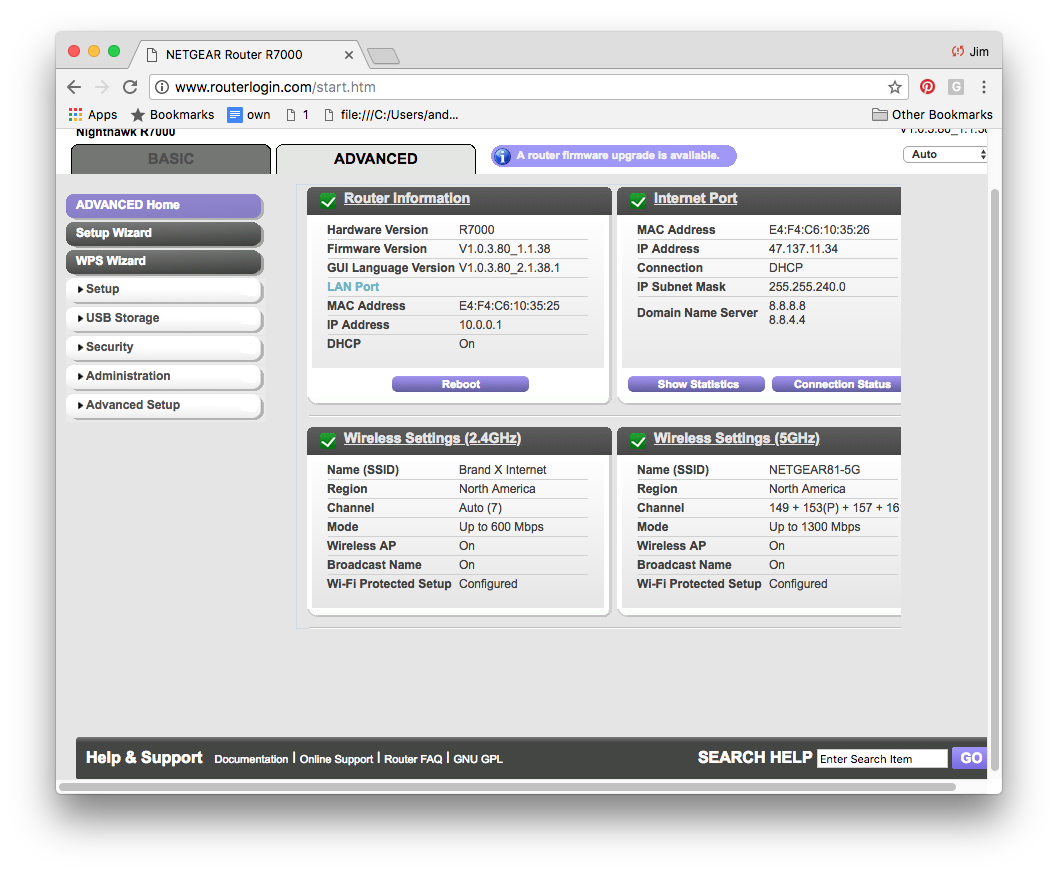
You can also check to see the network status. That is shown under "Advanced", as shown in the picture below.
We see that we have a valid IP address and that the connection is DHCP. Everything looks fine, and we are online.
Our next task will be to set up WiFi Configuration. Skip down a little bit to that section.
Problems
If you can't get online, the first thing to do is to go back and have a look at the modem. Is that DSL light really green and solid?
If the DSL light is blinking or off, then nothing you do makes any difference, it's not going to work. This means there is no DSL signal. Check your telephone cable to the modem, say some curse words, turn the modem off and on a couple of times, and if that doesn't work, call us up and report line down.
If the DSL light is solid, then check the cable from modem to the router. Often there will be a little light that will indicate a good ethernet connection to the modem.
If we have a good dsl light, and the cable looks good, then we should look for a configuration issue.
If the configuration types PPPOE and DHCP are mixed up, then it's not going to work. If you hvae PPPOE and the username or password are spelled incorrectly, it's not going to work.
If you have checked all these things, and it's still not working, then call us up and report the problem.
If all problems are solved, then go to the next section, WiFi configuration.
WiFi Configuration
There are many ways to set up WiFI, but I will show you how we usually set it up.
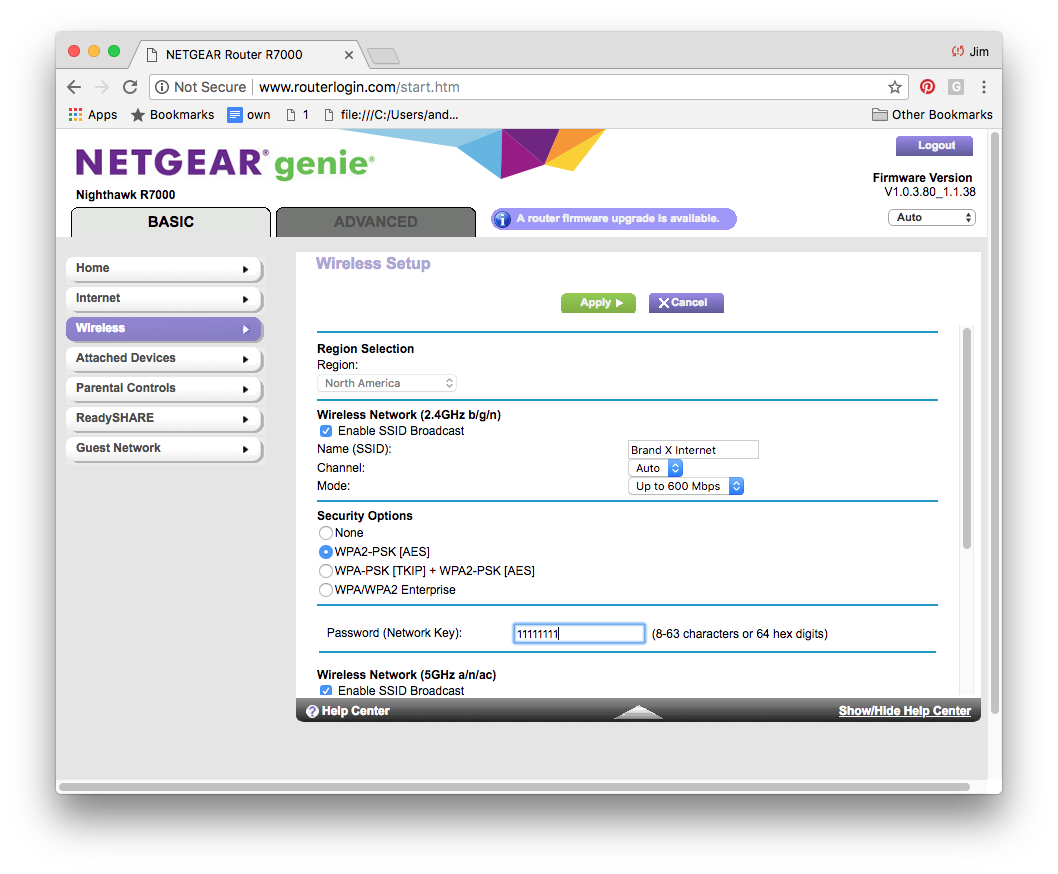
Click on "Wireless" at left in the menu.
On the right side, we usually set the SSID to "Brand X Internet" and the password to 11111111, which is the number 1, eight times. This is about the simplest password you can have. I wouldn't use such a simple password on my email, but for wifi it's ok.
When you are done it should look something like this picture:
Great, you are done. Test the wifi, and you should be able to get online.